
Introduction
Have you ever walked into your living room and felt like it needed a little something more – a bit of personality, a splash of colour or even just a bit of a change to give it a new lease on life? You are not alone. You are not alone in that feeling to transform your space without spending a fortune or undertaking a major renovation project. The good news is that one of the most effective, cost-efficient, and fun ways to achieve this is within easy reach – pun intended – in the form of pillow covers.
Home-made pillow covers are one of the most overlooked home décor projects. They may be tiny, but they pack a punch. The right pillow cover can completely transform the atmosphere of a room, adding texture, warmth, colour, and personality that even the most expensive furniture can’t match. Whether you are an experienced crafter or a complete novice with a needle and thread, DIY pillow covers are a world of creativity, versatility, and satisfaction.
In this article, we will take you on a journey through the world of DIY pillow covers, so you can spruce up your home this weekend. We’ll cover why these small but mighty home accessories are so magical, what materials and equipment you will need to create them, ten beautiful design ideas, starting from the most basic and progressing to the most complex, professional techniques to help you achieve a flawless finish, and personalisation tips to make each pillow cover uniquely yours. By the end of this article, you will be inspired and inspired to make something magical.
So set aside some time this weekend, and let’s explore the world of DIY pillow covers!
How DIY Pillow Covers are the Quickest Way to Change Your Home Décor
When we think of home décor makeovers, we often think of painting a wall, purchasing furniture, or hanging a new painting. These projects can certainly have a big impact, but they can also be time-consuming, expensive, and even a bit of a pain. But DIY pillow covers are an incredibly quick, versatile, and affordable alternative that can have equally dramatic effects – often within hours.
The Power of Soft Furnishings in Interior Design
Soft furnishings have always been a staple of interior design. Soft furnishings add warmth, texture and human comfort to a room, and pillows are one of the most adaptable. Replacing your pillow covers isn’t just about changing the fabric, but changing the entire colour scheme of the room, adding new textures and establishing an entirely new aesthetic. A beige couch can be boho chic with macramé pillow covers, contemporary and minimal with solid geometric patterns, or warm and rustic with plaid flannel pillow covers. It makes a world of difference what pillows you put on them.
The Unbeatable Value of DIY Pillow Covers
Perhaps the most obvious benefit of DIY pillow covers is their cost-effectiveness. Designer pillow covers range in price from $30 to $150 each and, if you’re looking to update a couch, four to six pillows can be quite expensive. Homemade pillow covers, on the other hand, can be created for between $3 and $15 per pillow cover, depending on the type of fabric selected. Purchasing fabric from a local store, using old clothes or even repurposing used linens can bring costs down even further. Over the long run, this can add up to significant savings – particularly for those who like to change their décor for the holidays or other special events.
Instant Gratification and Creative Fulfillment
With DIY pillow covers, the results are nearly instantaneous. Sewn pillow covers take an hour or less to make, while no-sew covers can be done in just ten minutes. This is highly gratifying. You dream it, you make it, and by the end of the day, it’s enhancing your living space. This creative satisfaction is not only satisfying and uplifting, but it also gives you confidence to take on bigger and bigger projects in the future.
Versatility for All Seasons and Styles
DIY pillow covers are also highly versatile. When you make your own pillow covers, you can choose the size, fabric, color, type of closure and decorative features to work with your current room decor or the look you are trying to achieve. Feeling like some holiday cheer with velvet covers? You can do that. Want to transform your living room to a seascape for summer? You just need a set of nautical embroidery pillow covers. DIY pillow covers’ versatility means your home can be as malleable as your personal style, life stage or the time of year – all without breaking the bank.
Sustainability and Mindful Consumption
In our modern society, consumers are increasingly aware of the environmental consequences of their consumption patterns. Sustainability is a great choice when making DIY pillow covers. Repurposing old fabric scraps, upcycling old garments or using sustainable materials such as organic cotton or linen, you can create lovely home furnishings while minimising waste. This conscious creativity brings crafting in line with the values of many contemporary homeowners, and makes each pillow cover even more special.
A Gateway to Broader DIY Skills
Lastly, DIY pillow covers are a great way to get started with sewing and other fabric crafts. The techniques you learn – measuring and cutting, sewing straight seams, handling various fabric types, and finishing seams – are skills that translate to other projects. Numerous seasoned sewers and quilters credit their love of the hobby to a pillow cover they sewed in the early days. Making DIY pillow covers is not only a home décor choice, it is a choice for lifetime creativity.
So, DIY pillow covers are quick, cheap, creative, environmentally friendly and highly versatile. They are simply one of the best ways to spruce up your décor and this weekend is the best time to get started.
The Tools and Materials You’ll Need to Make DIY Pillow Covers
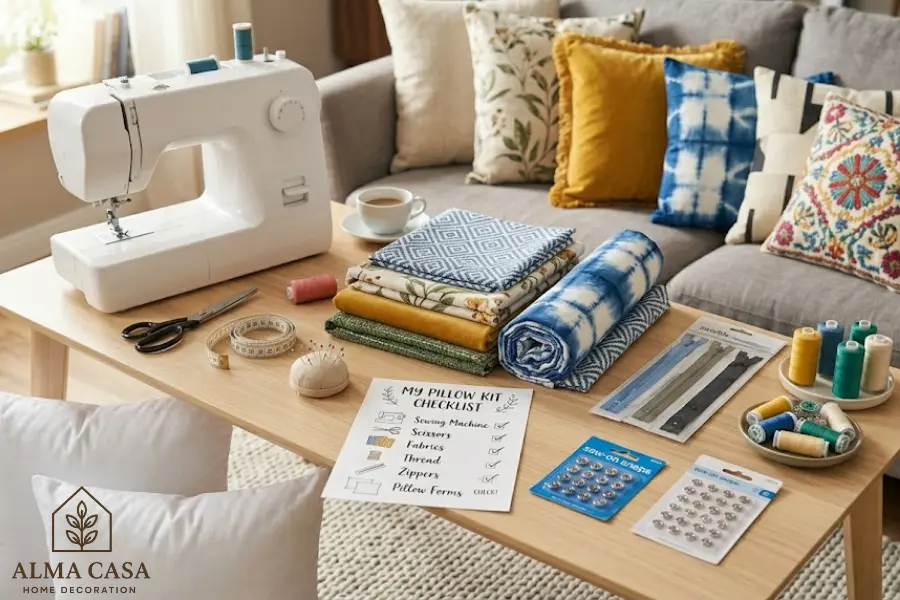
To ensure a successful and enjoyable experience in creating beautiful DIY pillow covers, it’s crucial to have the right tools and materials on hand. This will help ensure your creative journey is efficient, enjoyable and stress-free. Whether you are planning to hand-sew your pillow covers, use a sewing machine, or even try no-sew methods, this section will set you up for success.
Fabric: The Key to a Great DIY Pillow Cover
Fabric is the most critical element when making pillow covers. The type of fabric you choose will impact not only the look of your finished pillow cover but also how easy it is to work with when creating the cover. Here are a few of the most common choices of pillow cover fabric:
Cotton is probably the easiest fabric to work with. It’s easy to work with, does not fray badly, doesn’t wrinkle easily, and comes in a vast array of prints and colours. Cotton canvas and cotton twill are good options for more durable pillow covers.
Linen provides a slightly rustic feel that is perfect for coastal, bohemian, farmhouse and minimalist styles. It is a little more difficult to work with than cotton as it wrinkles easily, but the finished product will be beautiful.
Velvet is perfect for designing high-end looking pillow covers. It’s a deeply saturated colour and has a luxurious texture. Velvet can be tricky to work with as it tends to slip, but with a little extra caution, it’s achievable.
Burlap is a great choice for country and farmhouse style decor. It is cheap and lends a great texture.
Fleece and knit are great options for casual, warm pillow covers and are very forgiving for beginners as they don’t fray.
Always buy a little extra fabric than you actually need for the project to allow for mistakes and seam allowances. It’s a good idea to purchase at least half a yard more than you think you need.
Tools Needed to Sew Pillow Covers
If you are going to make your pillow covers, either by hand or machine, you will need:
A sewing machine is the quickest way to make neat and strong seams. Even a low-end machine will be sufficient for pillow covers. Ideally, it will have a straight stitch and a zigzag stitch, as these two stitches are all that is required for most pillow cover sewing.
Needles are required for hand-sewing or machine-sewing. For a variety of fabrics, use a universal needle size 80/12 or 90/14. Use a stronger needle for heavier materials such as denim and canvas.
The thread should be a similar colour to your fabric. Polyester thread is the best option for DIY pillow covers.
You will need fabric scissors or a rotary cutter and mat to cut your fabric. Never use paper scissors to cut fabric, as they will become blunt and tear the fabric.
Pins and a pin cushion are used to hold fabric in place before you start sewing. For heavier fabrics, fabric clips are a good choice.
A seam ripper is a tiny but useful tool for removing seams without damaging the fabric.
Measuring and Marking Tools
Accurate measurements are essential for ensuring that your pillow covers fit properly and have a professional finish. A flexible tape measure, quilting ruler and fabric marker (chalk or disappearing ink pen) will help you accurately measure and mark fabric before cutting.
Closure Materials
The closure is a critical aspect when designing DIY pillow covers. The most common options include:
Zippers create a seamless appearance and are very durable. Invisible zippers tend to be the most stylish.
Envelope closures don’t require any other hardware; the fabric is simply turned over at the back of the pillow and the pillow can easily be slid in and out. This is the easiest closure to use.
Buttons and buttonholes add decorative flair to pillow covers and are ideal for rustic, farmhouse, or vintage designs.
Ties and bows in coordinating or contrasting fabric are a beautiful option for a more rustic look.
No-Sew Alternatives
For those who don’t want to sew, there are great alternatives. Fusible webbing (also known as iron-on hem tape) is a fabric that adheres to another fabric when ironed, and creates a seam without the need for sewing. You can also use fabric glue, but it’s not quite as strong as fusible webbing. No-sew DIY pillow covers are ideal for novices and those looking for a quick and easy project without the complexity of sewing.
Embellishment Supplies
To make your DIY pillow covers even more unique, you may want to stock up on embellishment materials such as fabric paint, stamps, stencils, iron-on patches, ribbons, lace trim, pom-pom fringe, tassels and embroidery floss. These can add a unique touch to your pillow cover.
With these supplies on hand, you’re ready to make stunning DIY pillow covers that will impress all your friends and family.
This is the fun part – the designs!
It’s time for the fun part – the designs! From the novice to the advanced sewer, the next ten DIY pillow cover designs are sure to have something for you. These are in order from the simplest to the most elaborate, so you can build up to the more complex designs as you become more confident.
1. The Envelope Pillow Cover (Easiest)
The envelope pillow cover is the easiest project for beginners and probably the most common DIY pillow cover. There’s no zipper, no buttons, and little to no sewing. It only requires two rectangular fabric pieces (one slightly larger than the other), a hem on one edge of each piece, and then the two pieces sewn together along the edge with the hemmed edges overlapping at the back. This forms a pouch to hold the pillow insert. This version is a quick and easy 30-minute project, and looks surprisingly sophisticated when sewn with a good fabric.
2. No-Sew Fabric-Tied Pillow Cover
If you want to create a pillow cover in a hurry without any sewing, the no-sew fabric-tied pillow cover is for you. Measure out a piece of fabric, large enough to gift-wrap your pillow and tie the ends of the fabric into a bow. This design looks cute when using a patterned fabric. This is a great temporary decorating option.
3. Iron-on Appliqué Pillow
Decorate a simple pillow cover (either store-bought or sewn) with iron-on appliqué. Use fabric with fusible webbing on the back, cut out shapes, position them on your cover, and iron them on. This is a great way to make monogrammed, geometric, animal, floral, or any other shape of your choice. This is a great DIY pillow cover to decorate kids’ rooms.
4. Stamped or Stenciled Pillow Cover
By stamping or stenciling fabric paint onto pillow covers, you can make gorgeous and creative DIY pillow covers with minimal sewing skills. Simply apply your design to a plain cotton pillow cover with a foam brush or sponge, let dry, and then iron the paint to set. The finished product can look like a store-bought product, and the patterns can be as imaginative as you like.
5. Flannel Plaid Pillow Cover
You can cut squares from flannel and sew them together to make a plaid pillow cover, ideal for the fall and winter. Flannel is very forgiving as it doesn’t fray, making it a great choice for those new to sewing and looking for an easy project. You’ll have a cozy, inviting pillow cover that is perfect for the fall and winter seasons.
6. Boho Pillow with Fringe
Create a simple pillow cover using a natural canvas or linen, and cut fringe along the edges with scissors. Or attach a length of fringe trim to the cover’s edges for a more refined boho appearance. This look works well with rattan furnishings, macramé wall decorations and earth tones.
7. Linen Pillow Cover with Embroidery (Intermediate)
Embroidery can transform a plain linen pillow cover into a masterpiece. Select a design – a floral design, geometric pattern, a quote, or even a botanical print – and transfer it to your fabric with a water-soluble pen, then embroider it with simple stitches such as backstitch, satin stitch, and French knot. This is a longer project but a stunningly beautiful DIY pillow cover that you will love having for years to come.
8. Patchwork Pillow Cover
Using several fabric scraps to make a patchwork design is a great way to use up scraps and make your DIY pillow covers beautiful and unique. After cutting your scraps into equal-sized squares or rectangles, sew them together in a visually appealing pattern and use this panel as the face of your pillow cover. Patchwork DIY pillow covers are highly personal, versatile and a story in fabric.
9. Velvet Zipper Pillow Cover (Advanced Beginner)
Velvet is trickier to work with than cotton, but it’s worth the extra effort. A zippered velvet pillow cover is the epitome of luxury. Use a jewel tone (emerald, sapphire, amethyst, ruby) for the best effect. These pillow covers are ideal for elegant living rooms and master bedrooms.
10. Macramé-Front Pillow Cover (Most Impressive)
For a DIY pillow cover that’s as impressive as it is easy to make, use a macramé panel and fabric backing. Make a macramé panel using cotton rope and simple knots (the square knot and the spiral/half-hitch knot are the most common), then attach the panel to a solid fabric backing to finish the pillow cover. You’ll have a stunningly tactile, crafty creation that would look at home in a home decorating magazine. This project can be a bit challenging if you’re unfamiliar with macramé knotting, but it’s not that hard – and it’s worth it.
These ten DIY pillow cover ideas provide a range of creative challenges and design options. Collectively, they demonstrate the range of possibilities that can be achieved with creativity, fabric and a little know-how.
Expert Tips to Make DIY Pillow Covers Perfectly Every Time
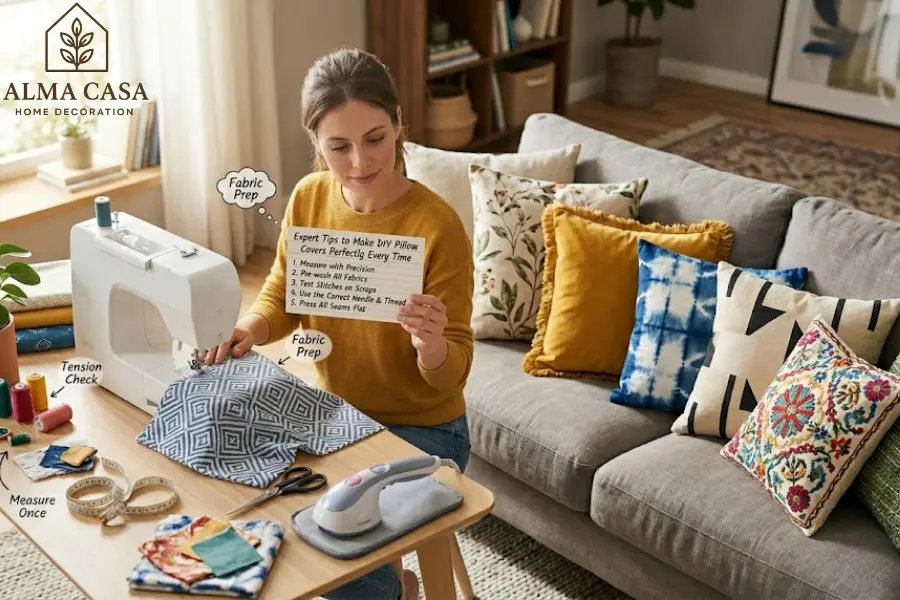
Knowing a variety of key techniques will give you the confidence and skill to tackle any DIY pillow cover project. Here, we’ll explore the techniques and processes that take a good DIY pillow cover and transform it into a professional creation. Once you understand these basic techniques, you will be able to produce perfect DIY pillow covers each and every time.
Step 1: Accurately Measure and Cut Fabric
Measuring is key to any DIY pillow cover. Start by measuring the size of the pillow insert – length, width and depth. To get a well-fitted, generous-looking cover, you’ll want your finished cover to be roughly one inch smaller than the insert in each dimension. This ensures the cover will hug the insert, giving the pillow a full and fitted appearance.
To determine the amount of fabric to cut, add seam allowances (usually 1/2 inch on each side, or 1 inch total for each dimension) to the cut measurements. If you are constructing an envelope-back cover, allow for extra fabric for the back flaps. It’s best to jot down measurements before you start cutting.
Step 2: Wash and Iron Your Fabric
A common mistake among beginners is to not pre-wash their material. Fabric – especially cotton and linen – will shrink the first time it is washed. If you create a pillow cover from fabric you haven’t washed, and then wash it, your pillow cover may shrink and fit the insert incorrectly. Wash and dry the fabric before you cut it to avoid this problem.
Once washed, dry the fabric, and then iron it to eliminate wrinkles before cutting. This will help you cut your fabric cleanly and accurately and will give you sharper seams.
Step 3: Cut Accurately
Measure and mark your fabric with a quilting ruler and chalk or disappearing ink pen. Use sharp scissors or a rotary cutter and cutting mat to cut out the shapes. Be patient and accurate – cutting is the key to a successful pillow cover. Sloppy cuts will result in crooked seams, which can affect the look and longevity of the pillow cover.
Step 4: Prevent Fraying by Finishing Edges
Unless you are using no-fray materials such as fleece, it’s worth finishing your edges before you start to sew to ensure the longevity of your DIY pillow covers. The most common methods include:
Seamlessly seaming the raw edge with a zigzag stitch from the sewing machine – the fastest and most common method.
Using a serger or overlock machine (if you have one) to finish the edge – this is a very clean finish.
Using pinking shears to cut a zigzag edge on the fabric to minimize fraying (this is a good option for fabrics that fray very little).
Turn the edge over twice (a double-fold hem) and press before sewing – this fully covers the raw edge and is suitable for cover openings and edges.
5: Sew Seams with Correct Seam Allowance
For a neat finish on your pillow cover, it’s important to sew with the correct seam allowance. A 1/2 inch seam allowance is typically used for pillow covers. To achieve this seam, line up the edge of the fabric with the 1/2 inch mark on your sewing machine’s needle plate, or use a magnetic seam guide if you have one.
Sew at a consistent and slow speed, particularly at corners. To pivot, stop with the needle down, raise the presser foot, rotate the fabric 90 degrees, and lower the presser foot to resume sewing. This will help to create clean, crisp corners.
Step 6: Sewing in a Zipper
If your design includes a zipper, don’t be scared – it is easier than you think to insert a zipper in a pillow cover. When using invisible zippers, press the zipper teeth apart using a warm iron. Attach an invisible zipper foot to your machine, place the zipper tape along the seam line of the fabric and sew carefully along the teeth. Once sewn in, an invisible zipper is completely concealed in the seam, giving a clean, finished look.
For standard zippers, simply align the zipper in the centre of the edge of your cover and staple it in place, then sew it with a zipper foot. Topstitching on either side of the zipper to finish.
Step 7: Press and Turn Right Side Out
After sewing your cover, press all seams open or towards one side using a hot iron. Pressing will set the seams, flatten out the seams, and give your pillow cover a neat finish. You will then turn the cover right side out, and use a blunt pencil or chopstick to fully turn out the corners.
Press the cover one more time with the iron before slipping in your pillow. This final ironing step will make a huge difference to the look of your finished cover.
Step 8: Insert the Pillow and Check the Fit
Place your pillow in the cover and check the fit. It should fit snugly with the insert completely filling the cover with no sag or wrinkles. If it is too slack, you may need to take in the side seams. If it is too tight, carefully ease the seams slightly.
A good fit on your pillow cover is the key to a professional-looking DIY project, and time spent evaluating and adjusting the fit is what will transform a good DIY pillow cover into a great one.
With practice and patience, you will soon find that your DIY pillow covers are just as good as – if not better than – those purchased from the shops.
Inspiring Ideas and Strategies to Customise DIY Pillow Covers for Every Room and Design
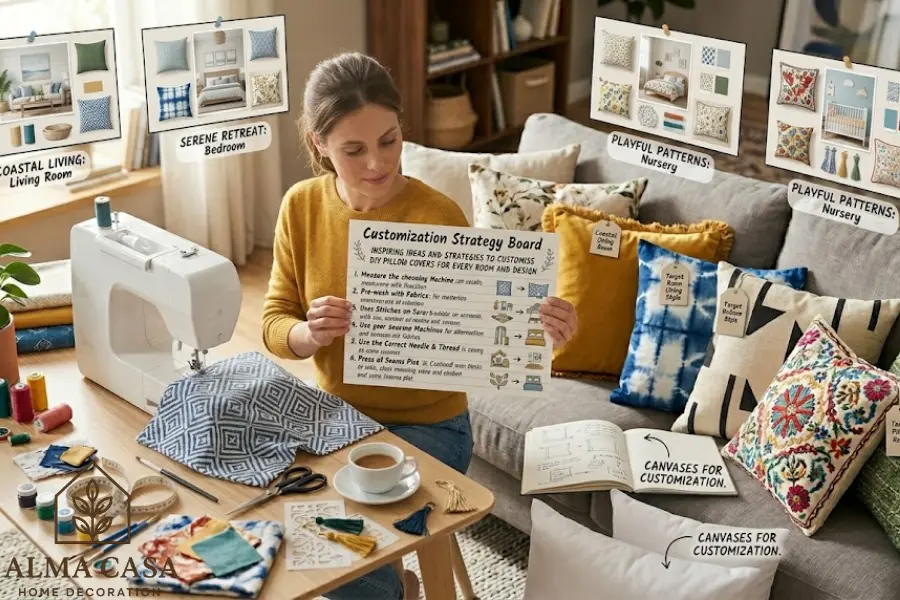
The beauty of DIY pillow covers is that they can be customized to suit any taste, style, or occasion. After mastering the fundamentals of pillow cover construction, the possibilities for personalisation are endless – making each cover a unique expression of your style, your living room, and your imagination. This chapter is filled with ideas and inspiration to guide you in customizing your DIY pillow covers for every room, style, and occasion.
Harness the Power of Color for Room Decor
Color is a powerful element in interior design, and can also be one of the easiest to manipulate when designing DIY pillow covers. A little bit of knowledge about color theory will guide you towards fabric selections that complement the rest of your room’s décor.
The complementary scheme uses colors that are opposite each other on the color wheel (for example, blue and orange, yellow and purple) to create a vibrant contrast. The analogous color scheme takes colors that are adjacent on the wheel (such as blue, blue-green and green) for a peaceful effect. The monochromatic scheme uses variations of a single hue for a classy and subtle look.
To select fabrics for your DIY pillow covers, place fabric swatches against your existing furniture, curtains and rugs to see how the colours will interact in your home. Lighting conditions can also influence how colors look, so consider how the fabric will look in the lighting in the room where they will sit.
Play with Texture to Add Interest
Another design feature of professionally decorated rooms is the mixing of textures. Instead of using the same material for all your DIY pillow covers, try mixing textures for a more complex and elegant aesthetic. Combine a sleek velvet cover with a textured linen cover and a fluffy knitted cover for a sofa arrangement that looks opulent, exciting and engaging. The different textures add visual interest and depth to the room.
Confidently Mix Patterns
Mixing patterns is an advanced styling strategy, but once you learn the rules it’s not very difficult. To master pattern mixing in your DIY pillow covers, it’s important to mix different scales of patterns with a consistent color scheme. A large floral pattern works well with a small geometric pattern and a solid color as long as they all share at least one color in common. This combination provides unity and contrast, ensuring your design is balanced and visually exciting.
Personalize with Trims and Embellishments
Trims and embellishments are the simplest way to add a touch of personal style to DIY pillow covers. Consider adding:
Pom-pom tassels for a whimsical, boho look. Silk ribbon border or stripe for a sophisticated touch. Tassels at the corners for a worldly, eclectic design. Lace trim around the opening for a romantic, vintage feel. Decorative patches for a playful, youthful or unique touch. Piping (a narrow cord with fabric cover sewn into the seam) for a clean, sharp, sophisticated look.
These touches are easy to create and use up little time and material, but can make a huge difference in the look of a pillow cover, giving it a custom-made, boutique feel.
Personalize with Monograms and Custom Embroidery
The easiest way to give a DIY pillow cover a unique touch is to add a monogram or embroidery design. You can use an iron-on kit, embroidery, or fabric paint and a stencil to create custom initials, names, dates and other symbols that are significant to you. Personalised pillow covers are also extremely special gifts for weddings, housewarmings, baby showers and other birthdays.
Make DIY Pillow Covers to Suit the Season
The great thing about DIY pillow covers is that you can easily change your home’s decor with the seasons without breaking the bank. Create a seasonal set of DIY pillow covers:
Spring: Delicate floral patterns in pastels, white linens with embroidered flowers. Summer: Striped, ocean blues and white, palm leaf prints. Fall: Plaids and chunky knits, burnt orange velvet, gold and rust colours, pumpkin embroidery. Winter/Holiday: Rich jewel tones, fuzzy knitted covers, holiday motifs, metallics.
Organise your off-season covers in labelled bags or boxes for easy seasonal rotation, giving your rooms a constantly refreshed look.
Customise Your Designs to Suit the Room’s Function and Mood
Various rooms in your home have different functions, which require different design solutions for DIY pillow covers:
Living Room: This is an area to show off, so focus on visual appeal, colour coordination and texture. Use a combination of sizes (large, medium and small) and at least one or two more intricate covers as an accent.
Bedroom: The bedroom should be about comfort and relaxation. Opt for soft, textured materials in soothing colours such as pastel blues, greens, neutrals, or even deep, relaxing colours. Monogrammed and embroidered covers create a cozy feel.
Children’s Room: Bright, playful and washable. Use washable fabrics in bold colors with fun designs – such as animals, stars, cars, or characters made with iron-on appliqué.
Home Office: Select sleek, professional-looking pillow covers in solid or low-key patterns that promote a sense of calm and productivity.
Outdoor Spaces: If creating DIY pillow covers for outdoor furniture, make sure to use weather-resistant, outdoor fabrics such as Sunbrella or other UV and waterproof materials.
Document and Share Your Creative Journey
Lastly, take photos of your DIY pillow cover projects and share them on social media, craft blogs, or in craft communities. Documenting and sharing your creations not only inspires other artists but enhances your own creative process. You might learn something new, get feedback, or find a community of fellow crafters who will encourage and inspire you to continue learning and experimenting.
There are endless ways to personalise DIY pillow covers. Each fabric, each decoration, each shade of colour can be used to showcase your personality and to bring a new and beautiful touch to your home.
Conclusion
DIY pillow covers are one of the cheapest, most satisfying and endlessly creative home decor projects you can undertake – no matter your skill level or financial constraints. As we’ve discussed in this article, the effect of DIY pillow covers on the look and feel of your home is far beyond their small size. They are a creative way to showcase your taste, update your interior according to the seasons, and constantly renew your home, with minimal costs and effort.
From the minimalist elegance of a no-sew envelope cover to the hand-crafted beauty of a macramé-front design, from the technical challenge of setting an invisible zipper to the artistic pleasure of hand-embroidering a floral pattern, DIY pillow covers are a creative journey that becomes more fulfilling the further you venture.
This weekend, allow yourself the chance to make something beautiful. Select your materials, assemble your equipment, pick a pattern you love and start. You will learn a new skill, have a newly decorated space, and the joy of creating something with your own two hands that brings beauty, warmth and character to the place where your life is lived.
Your home is your canvas. DIY pillow covers are your brushstrokes. Now go create something beautiful.